Note: I completely rewrote and updated this post. Read the new version here.
Did you ever have to do some extremely boring task over and over again in SolidWorks?
Jobs like creating 2D drawings of hundreds of sheet metal parts. Or assignments like exporting all fifty configurations of a part separately.
Oh by the way, could you also write down the mass of each configuration?
How did you manage to pull through? Did you watch a TED talk or a Pando Fireside Chat while clicking a popup away every minute or so? I feel for you if you were able to finish a fireside chat while doing monotonous work, because those chats can last for hours (fortunately, I also highly recommend watching them).
A dose of automation
Few things are more annoying than doing mind-numbing work when you really want to do grander things with your day. That’s probably why mankind started to create machines in the second half of the 18th century, at the start of the industrial revolution. It gave us more time and we were able to increase production in textile and iron manufacturing by sometimes a factor or 50 within a few decades.
The second industrial revolution gave us the widespread use of railways, electricity, telecommunications. The third or digital revolution made digital electronics in the form of computers and phones appear in abundance.
It seems that the tasks we see as monotonous have somehow evolved over the past centuries. I do have to admit that eight hours of clicking a single mouse button sounds better than 14 hours of hammering steel. Buy hey, there is an opportunity here to improve our own lives even more, so why not take it. We might be able to save ourselves 15 minutes a day for the coming years. That sounds pretty damn good to me.
Mighty macros
I’ve tried many approaches for suppressing my boredom while repeating a simple task, but preventing that boredom from happening altogether using automation has been the most fruitful one of the bunch. It just requires you to really think about the problem at hand, to write down all of the steps and to convert it into code.
Once you have your piece of code, you may only have to start the program by clicking a button. After that, it does its magic and you’ll get the credits for its results.
One of my macros greatly reduces the amount of clicks necessary to create a 2D drawing of simple parts. On good days I use this macro at least fifty times. Another tiny tool increases or decreases the sheet scale of a drawing with a single click. It’s awesome.
Automation and SolidWorks
SolidWorks has many options for automation. It allows you to record, create and execute macros. There is also the option of installing add-ins from SolidWorks itself or from third parties. If you want to automate your tasks, I suggest you create your own macro or let someone create it for you.
Macros can be powerful, even when they’re simple. They can perform tasks you deem unworthy of your time, but they need to get done anyway. Macros are like tiny little robots. They like uninteresting simple tasks. They won’t get bored. They don’t need breaks. They can keep your PC busy when you’re away, and nap off when you return.
The sheer happiness that takes hold of you when a task (that you used to do manually) happens automatically is bewildering. This is especially true if you wrote that program yourself.
You don’t need to be a software engineer by profession to be able to create macros, but a basic understanding of programming will help. I myself am a mechanical engineer with interests in all things technology (I’ve copied that from my LinkedIn profile by the way :P).
Recording macros
The first step in learning how to create macros is by recording your own actions using the macro recorder.

This great video by GoEngineer shows you how to record your actions and let SolidWorks convert them into a macro. You can then create a button in your toolbar to run the macro whenever you need it again.
VBA editor
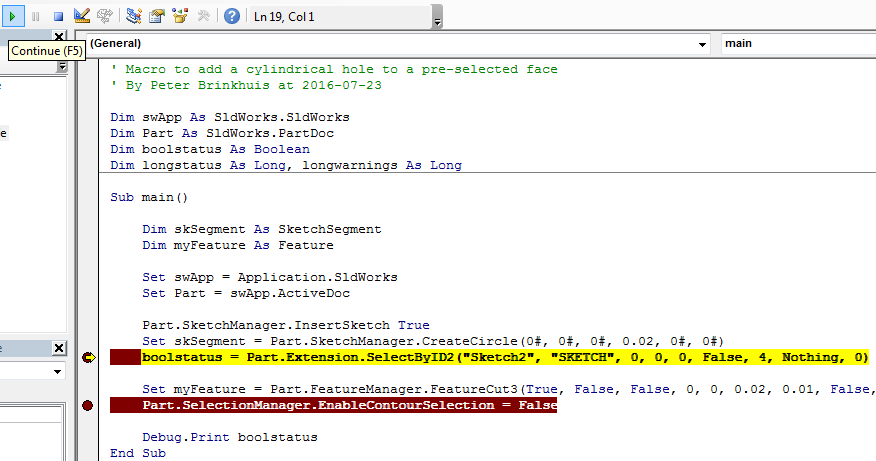
I have recreated the actions in this video and stored the result. Clicking the rightmost button on the in the macro toolbar will open up the Microsoft Visual Basic For Applications editor. In my case it looks like this (click to enlarge).

The window is divided into five sections:
- Upper left: Project Explorer. Here you can find the modules, user forms, class modules and SolidWorks objects that you macro consists of. Right click to add any one of those things.
- Lower left: Properties Window. When you select an element in a UserForm, the properties of that element will be shown here.
- Big one in the center: your main window for the code.
- Lower center: Immediate window. You can write text to this window for easy debugging. The text will stay there until you manually select and delete it.
- Lower right: Watches. You can right click a variable and add a watch to it. When you step through the macro with a few lines at the time, you can follow how the contents of this variable evolve.
One window that isn’t visible here is the Locals Window. When this one is enabled it will show you a list of the variables in your code and their current values.
Recorded code explained
I added a few numbers in red to the previous image to explain the code that was created by the recording.

- A line that starts with a quote ( ‘ ) will be a comment and it will not be executed. It is good practice to start your code with a few lines on the who, why and how.
- The variable called swApp is created, or defined. The variable type is object, which means it can basically contain anything. It is better to pick a more narrow variable type so cannot put incorrect data into the variable. This variable is used in every SolidWorks macro and most people call it swApp to be able to read each other’s code easily.
- Other variables are defined, as you can see you can define multiple variables on one line
- The sub procedure called main is created. This whole thing we recorded is called a procedure. Everything until the “End Sub” at line 19 is a part of the main sub. The brackets can contain variables that this sub procedure needs to function, in this case we need none. Main is the sub procedure that gets called by default when no sub procedure is specified.
- The swApp variable is set to the current SolidWorks application so that they can talk with each other.
- The Part variable is set to the document that is currently open
- Because the variable Part is assigned the active document, there are now special SolidWorks functions that can be called. Add a dot after a variable name to see all available functions. Right here we use the function InsertSketch to start a sketch on a pre-selected surface. There are no parentheses here, which means we do nothing with possible return values of this function.
- ClearSelection2 is the second and latest version of the ClearSelection function. A surface or plane was selected before the macro was started, it is deselected here.
- A new sketch segment variable is defined. Because it is defined within a sub procedure it is called a ‘local variable’ which means it can only be used within this sub procedure. The variables declared at 2 and 3 can be used from anywhere and are called ‘global variables’.
- A circle is drawn by the coordinates of the center point and one other point on the circle.
- The selection is cleared again
- A new sketch is created
- Again?
- The selection is cleared again
- The sketch is selected
- A new variable that can hold a feature is defined
- A new feature is created using the selected sketch and a whole lot of options. Luckily the help page will tell you what those options are.
- EnableContourSelection is used to select the contour of the sketch for the cut extrude. We don’t need that option anymore, so it can be disabled. Notice it wasn’t enabled in this code, so it is probably enabled by default.
- The main sub procedure is closed.
Recorded code improved
The code that gets created from the recorder is far from optimal. Variables are defined when they are needed and some lines are in there way too many times. Time to clean it up. This is what it looks like afterwards.

As you can see I have:
- Moved the variable declarations to the top of the program for clarity
- Chose more narrow variable types to prevent weird, unpredictable behavior.
- Removed the underscore at the definition of swApp. The underscore can be used to split a long line of code of multiple lines. That’s not the case here.
- Removed all of the selection clearances
- Removed two of the Insert Sketch lines that didn’t do anything.
- Set the draft angles of the feature to zero instead of 1.7451558415E-02. Two of the ‘false’ statements were to disable a draft anyway.
The functionality hasn’t changed a bit though. It still creates a sketch and a cut-extrude on a previously selected face.
Adding exceptions
It is good practice to add exceptions to your code. Basic checks include, in this order:
- If swApp is equal to Nothing to check if the connection to SolidWorks was made correctly.
- If swPart is Nothing, to check if a document is open and connected
- If swPart.GetType is not equal to swDocDrawing, to check if the open document isn’t a drawing.
For this particular macro, it would also be a good idea to check if a face was selected beforehand. If not, you can give the user a message box with an error and stop the execution of the macro.
Debugging
There are a few options that you should know when you want to properly test en debug your bits of code:
Step by step
You can execute your code until a certain point by setting your cursor where you want to pause and click Debug > Step into or by pressing F8. The code will run until it has reached this point. From there you can run it line by line by pressing F8. Pressing F5 will call the run command and this will run the macro until the end or until a break point is reached.

Break points
By left clicking before a line, you can add Break Points. The execution of code will stop at these points. Now you can assert the values of variables by hovering over them or by checking those that you’ve assigned watches to. Pressing the play button will make it hop until the next break point, hitting stop will make it stop immediately.
Debug.Print [variable name]
This line will add the contents of one or multiple variables to the Immediate Window, as long as they contain text or numbers. You can also print things like:
Debug.Print “The value of boolstatus is ” & boolstatus

Debug.Assert [variable name] [condition]
The line “Debug.Assert X > 10 ” will assert whether X is indeed greater than 10 and it will pause the program if it isn’t.
Call stack
The last tool for debugging that I want to mention is the Call Stack option. When the code execution is started and paused, you can press View > Call Stack to see how the current function has been called by other functions. When your tools get more complex, this can shed some light on who gets called by who.
Picking a language
Macros can be written in three Microsoft-based programming languages. The first one is Visual Basic for Applications (VBA), of which you have seen a lot above.
If you want to get started with reducing repetitive tasks in SolidWorks, start with macros in VBA. This programming language is the most accessible option of the one that are available to the SolidWorks user. The help website by SolidWorks is also extensive and sorted by version.
The other two options are VB (which used to be called VB.NET) and C#. These are the more modern and more advanced options. They also allow you to create add-ins for SolidWorks, this isn’t possible with VBA.
Sources and courses
If you want to get started on building macros for SolidWorks, here are some sites that will offer some great help:
- The official SolidWorks API Help
- The official SolidWorks forums
- Microsoft Office VBA reference
- CADSharp.com has many free videos and macros to learn from
- CADHero.com has free and paid video lessons for API programmers of any experience level
- AngelSix has two (rather dated, but still useful) freely available SolidWorks books and many macros
Doing a Google search in the form of “SolidWorks API [your search term]” will also do miracles. I’ve done hundreds of them recently.
If you want some professional guidance in your endeavors, you may want to enroll in this course by SolidWorks:
Your current Value Added Reseller or VAR can help you with official SolidWorks courses.
Final words
Are you exited to build a simple program that can take over some of your daily tasks? Please let me know what you are going to build in the comments! I’m pretty sure there are some great ideas out there.
Now let’s get those little robots to do our chores!