Good old sketch mode. You use it every time you create a part (except when you import one, that is). It was present in SolidWorks 95, the very first version of Solidworks, and it already worked roughly the same as it does nowadays. Back then it looked something like this:

Do you guys remember that? I surely don’t, I was nine years old at the time! Now that I’m close to ten years of using SolidWorks, here are some of the lessons that I’ve picked up along the way on how to properly use sketch mode.
Best practices
Use the proper planes
Your first action when starting a sketch, so my first tip. Please think carefully before you select a plane to sketch on. If you consistently model your parts using the planes that actually make sense and you make this a habit, you’ll get to enjoy parts that get inserted into assemblies with the correct orientation from the get-go. This seems like a minor thing, but it is actually pretty awesome. Oh and the people that have to work with your parts will thank you as well.
Sketch on a standard plane if you can
Most of the time, your first sketch will not make it into the final product. You are going to change things around quite often, you’ll change the order of your features, delete the first sketch or what have you. That is why you want to keep the amount of references to a minimum. The standard planes are always going to be there, so if the second sketch is also made on a standard plane, you can easily move it above the first sketch. You might have to recreate a feature every now and then, but that usually takes less work than recreating or debugging a sketch.
Make the origin a useful point
Don’t just start drawing a square with the origin as one of the corner points. Use the origin to your advantage. Make it the center of the first feature, or make it align with the center of the bearing that you’ll be fitting later. When the origin is at a useful point, adding mates to standard planes will be a breeze.
Keep references at a minimum
This one resembles the one above. SolidWorks is very quick to add all kinds of references to your sketch, even if you don’t really require it. That coincident relation to a parent feature might come back to bite you if you didn’t really need it, and it can create all kinds of weird sketches and errors.
Completely define the sketch
I ask you, please make your sketch fully defined. If you’re not doing that already and this is the only tip only remember of the entire post, somebody will be thankful for that in the future. I’ve seen sketches so poorly made that one minor change would mess up the entire part. Please don’t be that guy, blue lines have no business in finished parts.
Don’t fix items
I shouldn’t have to say this, but please don’t. Fixing points or lines will make your sketch seem proper, until people notice that the opposite is true.
Use diameter dimensions
If you are creating a revolve, chances are you’re more interested in the diameter of the part than the radius. That is why you can double your dimensions if you’re using a center line. Just click a point or a line, click on the center line (not on an end point of a center line) and move your mouse away from your part. You’ll see that SolidWorks proposes a diameter dimension. Just one more click to make it final.
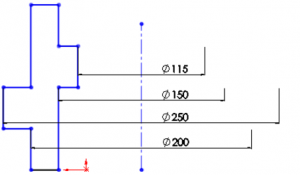
You can even do this with a point on a second center line. Click that point, click the center line, move away from the point and voilá.
Use keyboard shortcuts and mouse gestures
I don’t really use mouse gestures that often, but I’m planning to because it can really speed up your modeling work. Keyboard shortcuts are something that I do use, these are the ones that I use most often:
- Ctrl+8 to go Normal To your sketch plane
- L to draw a line
- K to draw a center line (it was close to L, that’s my only reason)
- C to convert items from other sketches or features
- M to measure
- Ctrl+M to mirror sketch items
- T to trim
- E to extend
Closing remarks
This was the first issue of my Best Practice series, but I have many more planned. If this helped you or if you have tips that I absolutely need to include, please let me now. I’ll then revise this post or create a follow-up later on.
Oh and one more thing: did you know you can create tangent lines by drawing a straight line, moving the mouse away and then touching the last point again? It will then automatically go into the mode of creating a tangent line.